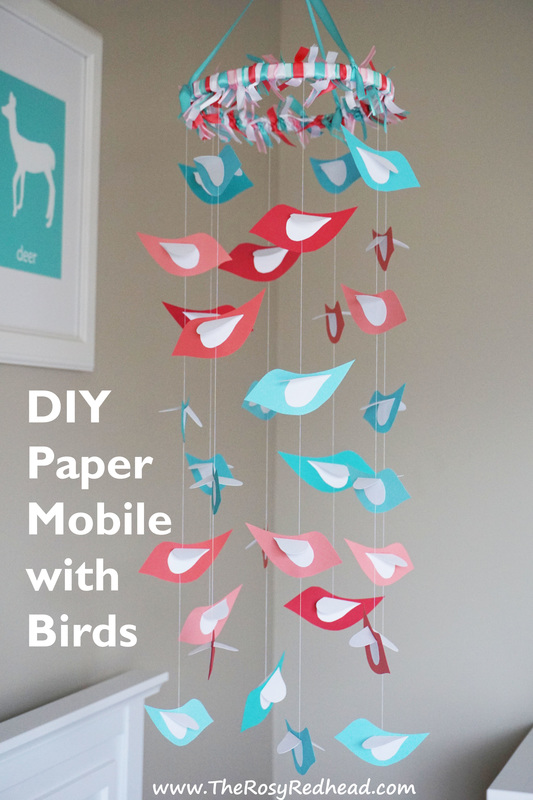
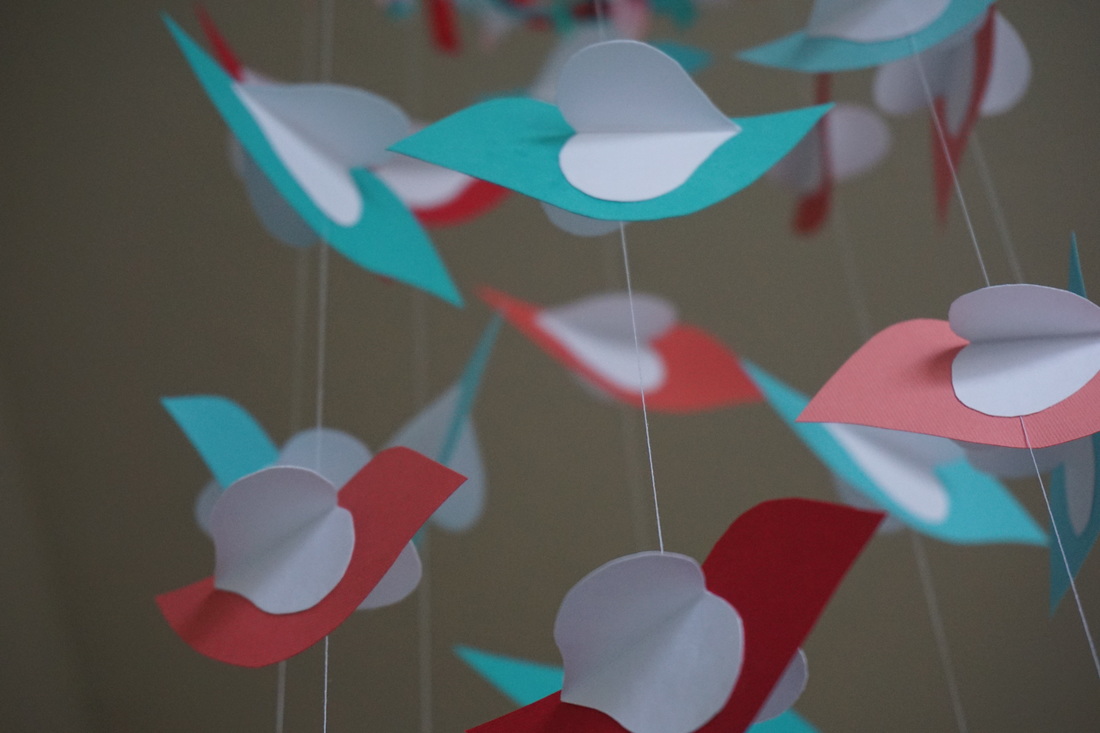
Paper mobiles are so fun and colorful for nurseries, kids rooms, photo props, and general decor. I love the way they catch slight air movements and gently turn. I made this one for my daughter's room, and it has been lovely. It has held up wonderfully for many months now. I simply love it!
I decided to share this step by step tutorial for anyone looking to make one. It really is a fun project. You might scroll through the steps and find it a little daunting, but it reads more difficult than it actually is. You can do it! I believe in you! Remember, it does not have to be perfect to be beautiful.
Supplies Needed:
- 1 - 8" Embroidery hoop
- White spray paint
- Ribbon cut into 4-5" lengths, approx. 90 lengths needed (use colors that coordinate with your paper birds)
- 32 - 4" paper birds (At least 3 colored sheets of 12 x 12 in paper in desired colors; more if you want more variety in color, are needed for these)
- 64 - 1.5" creased hearts (2 - 12 x 12 in white paper needed for these)
- 4 lengths of white thread each 23" long
- 4 lengths of white thread each 28" long
- Mod podge glue
- Foam brush
- Hot glue gun
Prep work:
Separate the two rings of the embroidery hoop. You will only be using the inside ring of the hoop. Spray paint the inside ring, and allow to dry. Set aside.
Cut your white thread into the lengths needed and set aside.
Cut your ribbon into the needed lengths, and set aside. How many you need will vary depending on your style of ribbon tying, but I used approximately 90 strips of ribbon on my hoop.

For the birds:
Each 12 x 12 sheet of paper makes approximately 15 birds each 4 inches long. So you will need a minimum of 3 sheets. If you are concerned that you may not cut them all perfectly, then get a little extra paper. It's better to have a little more supplies than you need than too few. I wanted to use a variety of colors, so I used 6 sheets of colored paper, and only cut 4 birds from each (and then saved the paper scraps for other projects (no need to be wasteful (I may be a paper hoarder))).
Each 12 x 12 sheet of paper makes approximately 15 birds each 4 inches long. So you will need a minimum of 3 sheets. If you are concerned that you may not cut them all perfectly, then get a little extra paper. It's better to have a little more supplies than you need than too few. I wanted to use a variety of colors, so I used 6 sheets of colored paper, and only cut 4 birds from each (and then saved the paper scraps for other projects (no need to be wasteful (I may be a paper hoarder))).
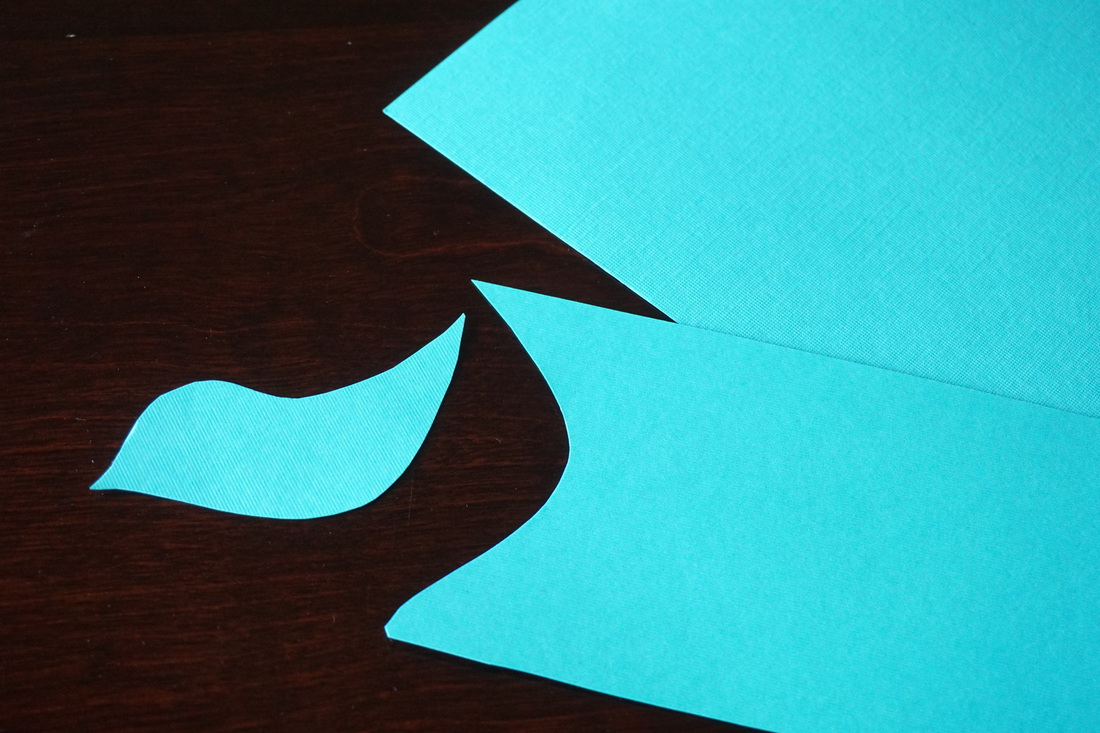
Now cut one sheet of colored 12 x 12 paper into 4" strips. Next, cut out a simple bird shape. It might be worthwhile to draw and cut out a template from a regular piece of paper first. It just depends on your comfort level with this sort of craft. Cut out 4 more birds from the strip. Then, repeat these steps until you have 32 birds.
For the hearts:
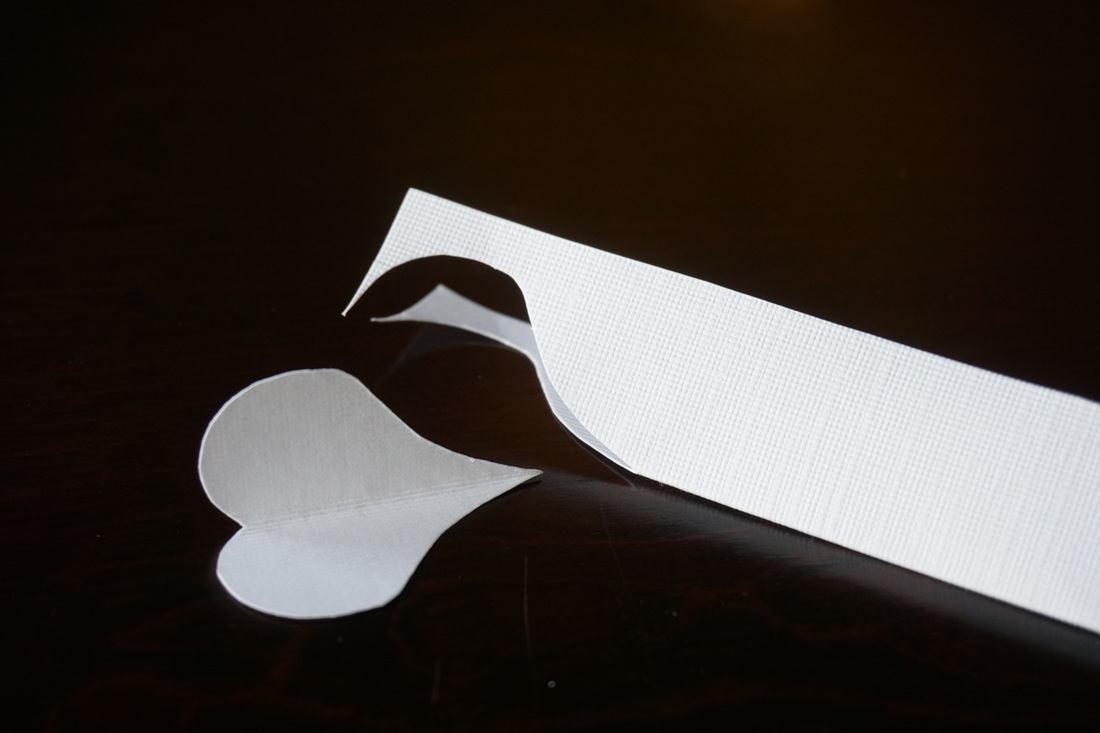
Cut your white 12 x 12 paper into 2' strips. Then fold one strip in half lengthwise. Next, starting from the top, cut out seven 1.5" hearts. Repeat this until you have 64 creased hearts.
Note: If you have a heart punch, by all means use it! You will still need to crease the hearts, but a punch would save you some manual labor. I didn't have one, so I cut mine out by hand.
Assembly:
Tie one end of each length of white thread to the hoop about 3 inches apart and alternating between the 23" and 28" lengths.
To keep each thread knot secure on hoop, put a small bead of hot glue where the thread knot rests on the inside of the hoop. You want it to be inside so that it is less visible if any shows through the ribbon. Allow the glue to cool and harden.
Once the glue has set up, you will need to trim the threads to the exact right length. You have 3 extra inches built in to each one to allow for tying knots if you cut them to 23" and 28".
Now you need to measure each shorter lengths (23" ones), and trim them down to where each one hangs 20" from the base of the hoop.
Then measure the longer lengths (28" ones), and trim them down to hang 25" from the base of the hoop.
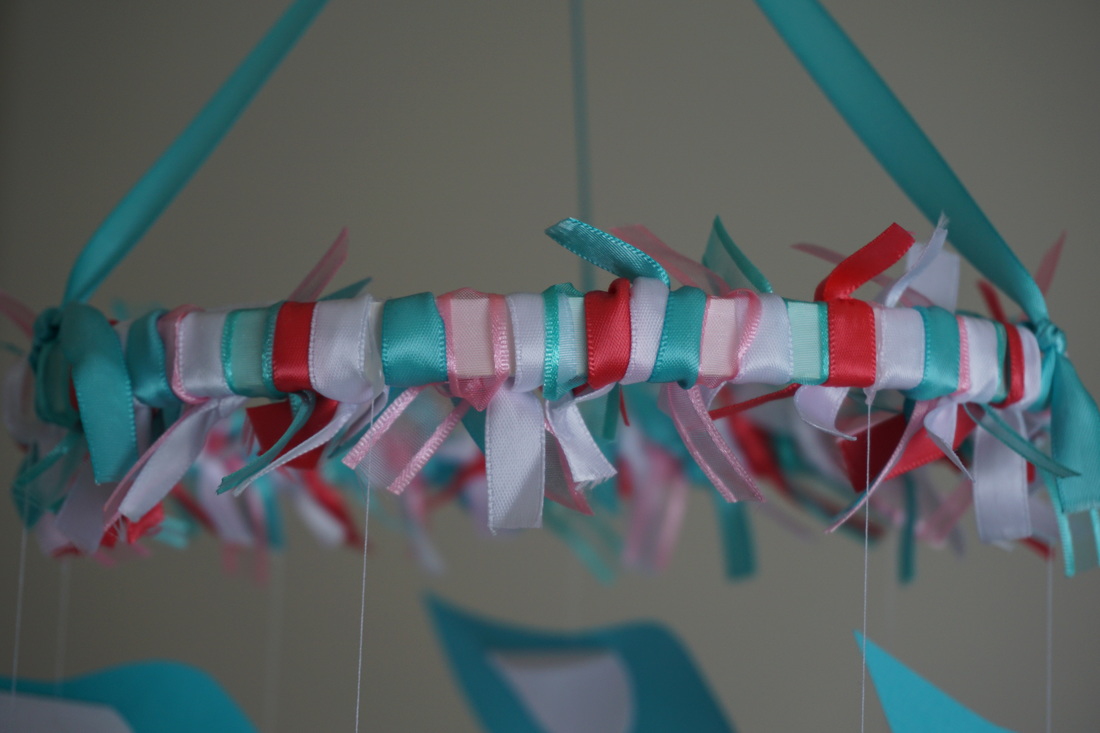
Now, tie your ribbon strips around the hoop. Work your way around the hoop alternating ribbon colors as you go, and being careful not to damage or move the thread knots that you just glued to the hoop.
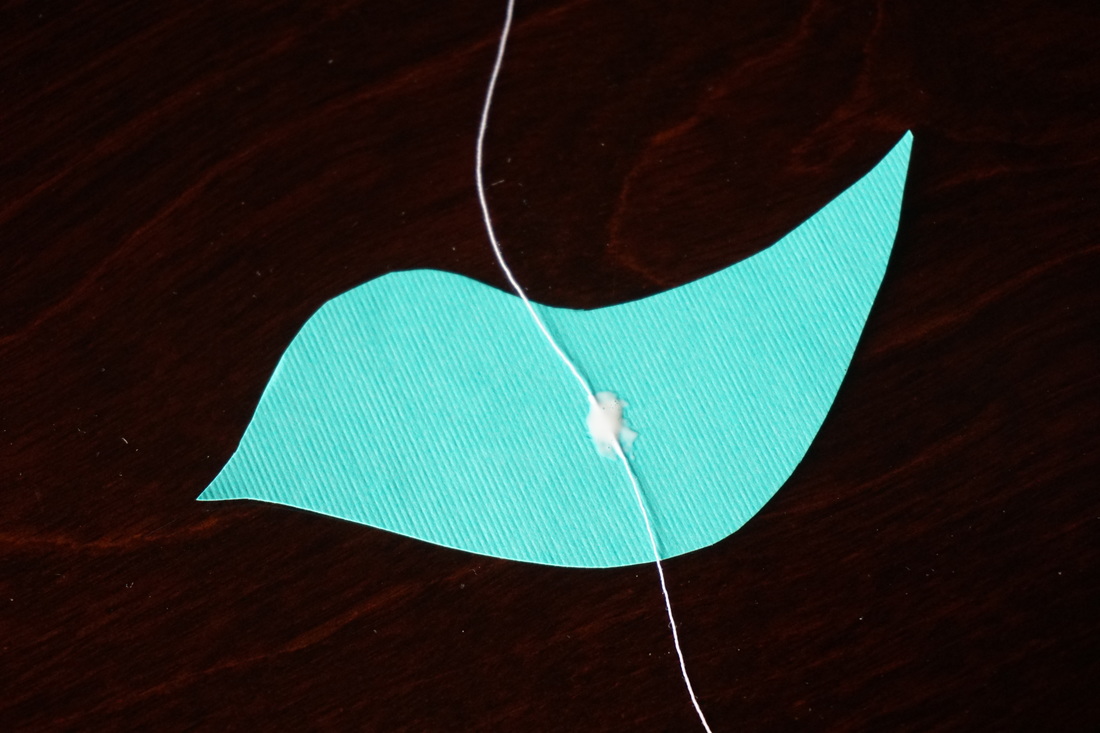
Next, start gluing your birds together with the string.
On the shorter 20" lengths, start roughly 3" down on the thread from the hoop base. On the longer 25" ones, begin about 5.5" down the thread from the base. Place a bird under the thread, and add a small bead of glue.
On the shorter 20" lengths, start roughly 3" down on the thread from the hoop base. On the longer 25" ones, begin about 5.5" down the thread from the base. Place a bird under the thread, and add a small bead of glue.
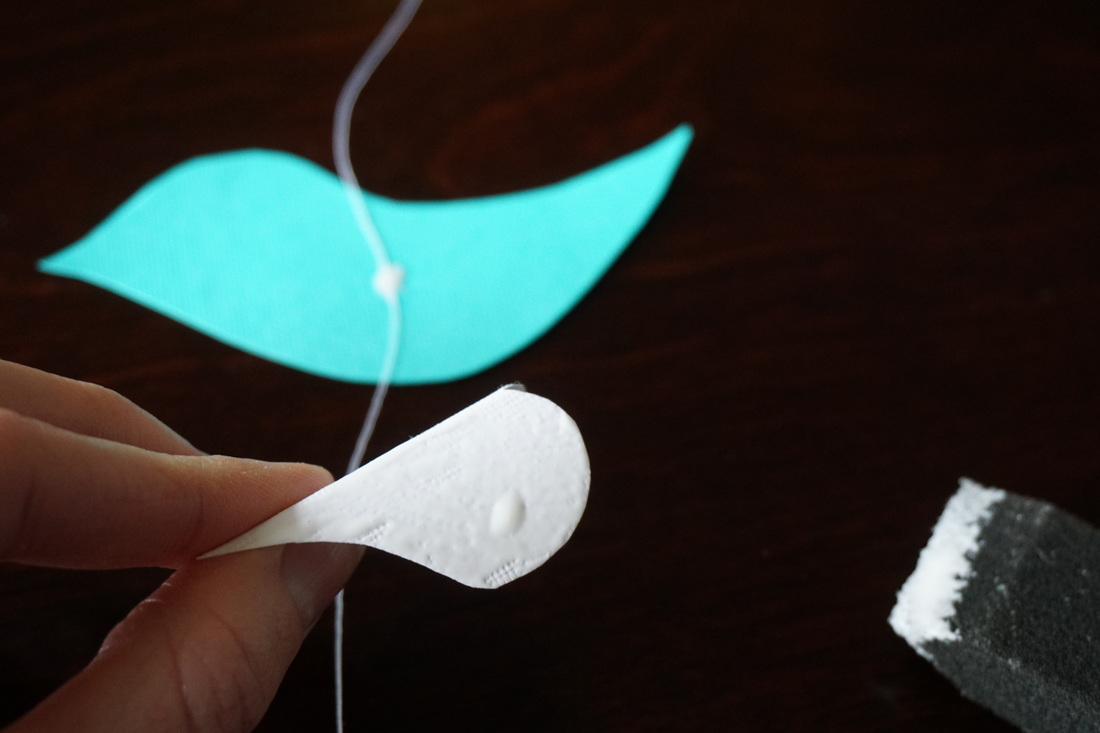
Now, paint a thin layer of mod podge glue on one side of a heart as shown.
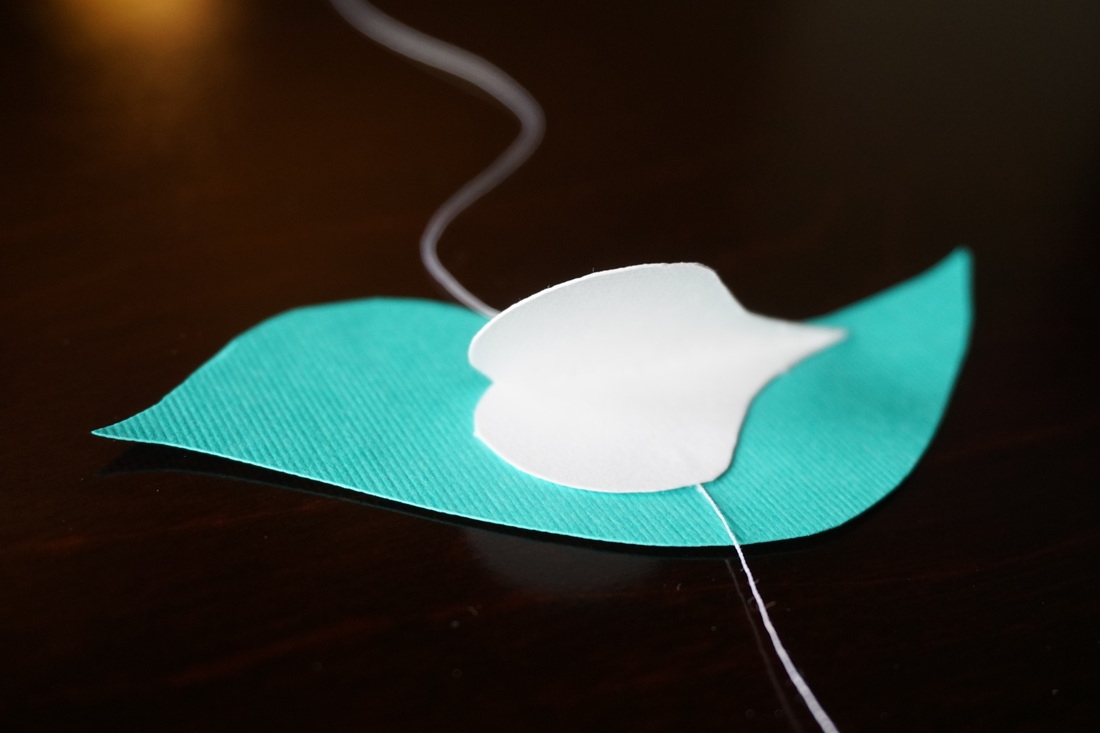
Then, flip the heart over, and place on the bird, over the thread. Press the heart so that it binds to the bird all the way around.
Flip the bird over being careful not to damage or move the wing that you just glued on, and glue a 2nd wing on the bird so that the bird's wings are symmetrical when viewed from below.
Repeat the steps in red text 3 times on each thread by moving roughly 5.5" down each time (it doesn't have to be perfect), and alternating bird colors. Be sure that the very end of each string is completely covered by a bird wing.
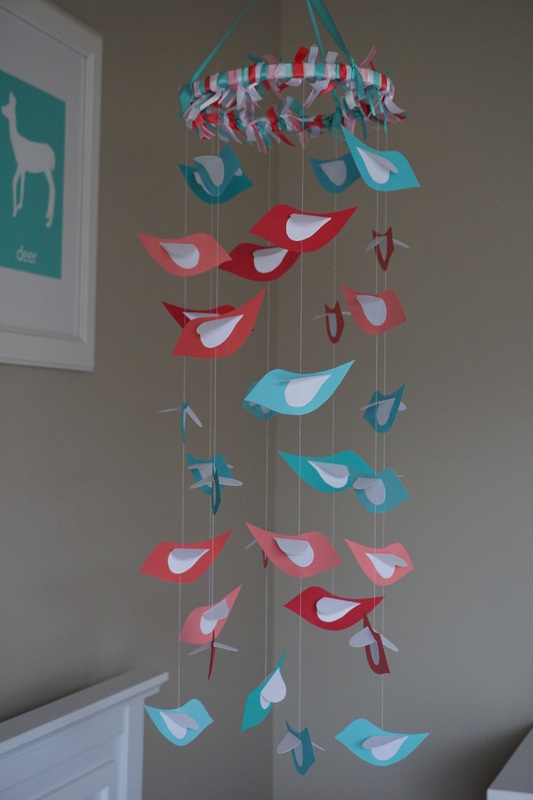
Allow glue to dry, and you are done! Phew! I knew you could do it! Now just hang it and admire your creation!
I used extra ribbon to hang mine, but twine could work too.
If you like this tutorial, feel free to share and pin!
I used extra ribbon to hang mine, but twine could work too.
If you like this tutorial, feel free to share and pin!
 RSS Feed
